Using Object Layers
Mastering the use of object layers is important in graphic design. This page layer tutorial will walk you through the basics of layers using Corel PHOTO-PAINT.
The uses and values of object layers in graphic design are manifold. An object layer is a piece of a graphic puzzle… it exists on its own two-feet and can be manipulated and edited independently of the rest of the graphic. In essence, its an entirely individual graphic inside the bigger graphic.
You can apply effect filters to a single layer. You can adjust one layer’s Tone Curve without adjusting the Tone Curve of other layers. You can paint on a single layer, delete from a single layer, and do anything else you can normally do to an image.
 First, you should open your Objects Docker. If it’s not already out, press "Ctr+F7” or click "Window > Dockers > Objects”. You can also download my workspace file.
Now you are ready to start using and manipulating layers. Create a new document ( Ctr+N ) or open an existing document ( Ctr+O ). When you create a new document or open a flat document (like a JPEG, GIF or BMP file) the image you see will be the background layer of this layered project. In your Objects Docker you will see the image labeled as "Background”.
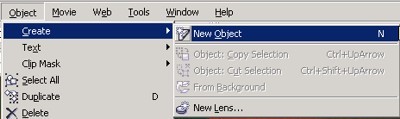
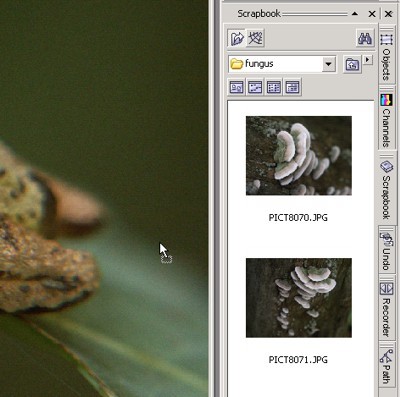 You can add new layers in a couple different ways. One way is to place an existing file on top of this image. To do this, use the Scrapbook Docker ( Ctr+f12 ) to browse your computer for an image to place into this document. Once you’ve found one you want, click on it and drag it onto your main image. You can also create a blank layer that can be painted on by clicking "Object > Create > New Object”.
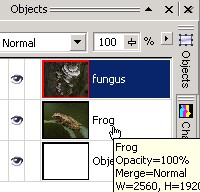
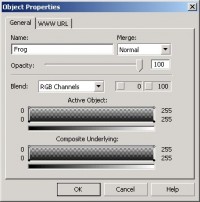
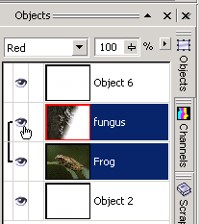
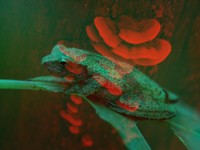
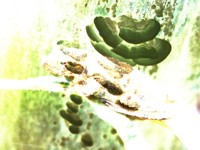
Now you’ll see another entry in the Objects Docker called "Object 1”. Each time you add a new object, the new object is named "Object 1”, "Object 2”, "Object 3”, etc. It’s good practice to rename new objects as you create them so that the name reflects the true nature of the layer you’ve added. In the examples here, the layers have been renamed "frog” and "fungus”. You can rename an object by double-clicking it in the Objects Docker and changing the name in the Object Properties dialog.
 You can tell which images are stacked above or below one another by looking at the Objects Docker. Those images at the bottom are below images listed above. This order is important when working with layers. Images on top can hide images below. Images on top are affected by the colors of lower images when using merge modes or transparencies, but lower images are not affected by upper images.
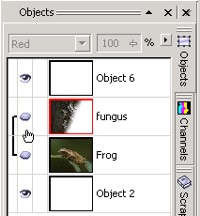
Object can be moved from layer to layer by selecting them in the Objects Docker and dragging them up or down.
 The Objects Docker allows you to quickly change the merge mode and overall transparency of a layer by selecting that layer and then clicking the merge mode drop-down or transparency slider. Mouse over different merge modes to preview their effects.
You can add as many layers as you want… which is one reason you should name them. Complex graphics can have dozens or hundreds of layers… and naming them makes it easier to select the layers you want to work on. Be aware that the more layers in a graphic, the more memory and processing time your computer uses.
 Sometimes it’s beneficial to group related layers. To do so, select the layers you want to group with the pick tool; be careful, as it’s easy to select unintended layers. To be sure you have only what you want, click the names of the layers in the Objects Docker while holding down "Ctrl” on the keyboard. Once you have the layers you want, press "Ctr+G”. The objects are now grouped, meaning that whenever you select an object from the group, the entire group is selected. If you move one object in the group, the entire group moves with it, etc.
 Another way to minimize the complexity of your graphic is to "hide” layers that you aren’t working on. To do this, click the Eye Icon of the desired layer to hide/unhide it. Just remember to take into account merge mode changes or transparencies.
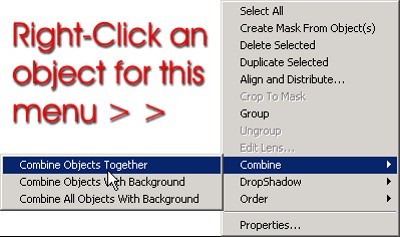
Sometimes you want to minimize the complexity permanently. To do this you can combine layers with each other or with the background image. To do so, select the desired layers and right-click one of them—you’ll see a "Combine” menu. Just remember that when you combine layers, you lose the ability to select them individually again.
This is enough information to get you started on some really interesting and complex graphic design.
When you are done editing your image, it’s always good to save one copy in the native editing format. In Corel PHOTO-PAINT that format is .CPT. Click "File > Save As” and save a copy in this format. This ensures that you can make further edits to layers in the master file.
But you can’t use a .CPT file in a web page or in all other publishing applications. What you can do is combine all the layers into the background and save it as a JPEG or GIF file (or any other format Corel supports). Remember to click "Save As” and save this new image as a different format than the original.
Layer Transparency Example
 Below is an example of using transparency and color merge on some layers. In this example the Fungus layer is selected and transparency is applied.
Layer Color Merge Examples
Below the fungus layer has a "Red" color merge.
Below the same graphic except the fungus layer has a "Divide" color merge.
- Using PHOTO-PAINT
Series of tutorials to help aspiring graphic designers learn to be proficient in the often-neglected environment of Corel PHOTO-PAINT.
- Related Topics